Would you like to gain insight into customer sentiment during their interactions with your company—whether through chat, email, or other channels—without requesting direct feedback?
Every customer interaction, from concerns to commendations, holds valuable information about your service and organization. To harness this, we have developed the Customer Interactions Touchpoint, enabling you to upload any interaction for comprehensive analysis by ISAAC.
To create this touchpoint type, it must first be activated within your environment, and you’ll need to be using the latest version of ISAAC. Please contact your Customer Success Manager or email support@hellocustomer.com for more information.
IN THIS ARTICLE
1. Create a customer interactions touchpoint
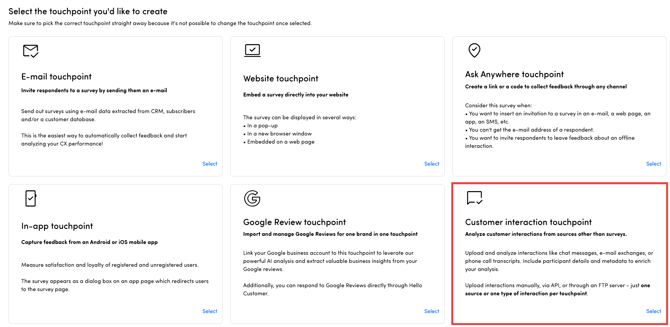
To start adding Customer Interactions to Hello Customer, create a new touchpoint starting from the homepage and choose touchpoint type "Customer interaction touchpoint".
1a. Settings
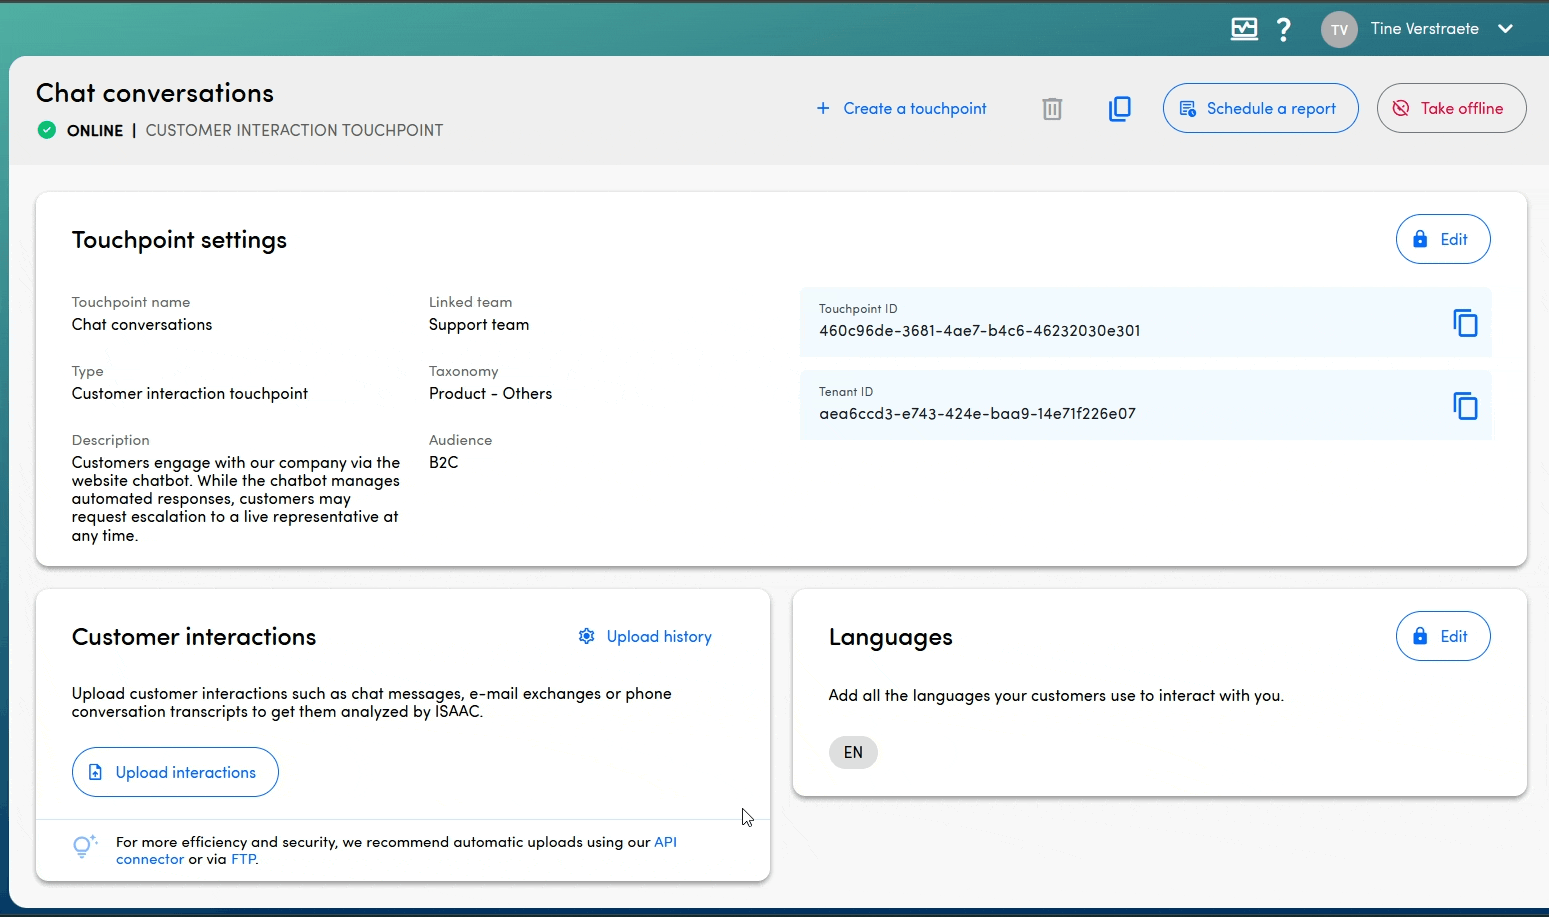
| Touchpoint details | Provide a name and description for your touchpoint. Both fields are required. In the description, briefly outline the context of the data you will be uploading. For instance: Customers engage with our company via the website chatbot. While the chatbot manages automated responses, customers may request escalation to a live representative at any time. |
| Team access |
Link your touchpoint to a team. Either select an existing team you already use for other touchpoints or create a new team directly from the dropdown. Learn more about teams here. Utilize the team filter to make sure users access only the relevant data within the platform. For a comprehensive explanation of the team filter’s role and configuration, consult this detailed article. |
| Context |
Select the taxonomy you want to apply to this touchpoint and the audience type. A taxonomy defines the set of category paths used in the final text analysis. You can choose either a default taxonomy provided by Hello Customer or create a custom taxonomy tailored to your needs. For further guidance, contact your Customer Success Manager or email support@hellocustomer.com. |
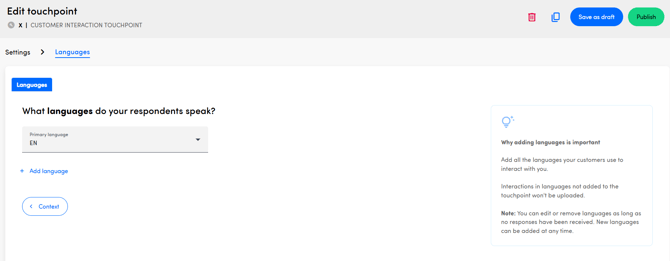
1b. Languages
Add all relevant languages to the touchpoint. For example, if you plan to upload email communications in English, French, and Dutch, ensure each of these languages is included in your touchpoint configuration. Additional languages can be incorporated at any time as your needs evolve.
1c. Publish
Once you have completed the settings and added the necessary languages, you can publish your touchpoint. At this stage, a comprehensive overview of your configuration becomes available, and you may begin uploading customer interaction data to the platform.

2. Upload data into your customer interactions touchpoint
2a. Manual upload within the platform
To add customer interactions manually via the platform, you go to the section Customer interactions on the touchpoint settings overview page and click Upload interactions.

- Start by downloading the template file directly from the interface. Each touchpoint has its own dedicated template, so ensure you always retrieve the latest version when working with a new touchpoint.
- The template contains several fields to complete:
- Column A: Language - Indicate the language of the customer interaction. This language must be enabled for the touchpoint; otherwise, the row will not be uploaded.
- Column B: Answer date - Specify the date for data visualization within the platform. This field is optional; if left blank, the interaction will appear under the upload date.
- Column C: Customer interaction text - Include the full customer interaction in this column, such as an entire chat transcript or email thread.
- Column D-H: Personal information - Optionally, provide customer personal details.
- Column G-...: Metadata - Add any relevant metadata as needed, for example, details about the agent handling the ticket or the product involved. For further information on metadata, consult our resources.
- Once all data is entered, upload the file via the platform. You can review all uploads in the upload history, where details on invalid rows and specific error reasons are available by clicking on the respective counts.
2b. Upload via our FTPs server
In addition to uploading files directly within the platform, you may also transfer your data securely to our FTPs server. This method supports automation, for example daily or scheduled uploads of new customer interaction files. Files placed on the server are processed automatically every hour.
For further guidance on this process, please refer to the dedicated article linked here.
2c. Upload through an API call
Finally, you also have the option to add customer interactions via an API call. This method is primarily designed for submitting responses to Ask Anywhere touchpoints, but it is equally suitable for adding data to Customer Interaction touchpoints. While the terminology may differ, the integration functions seamlessly.
For detailed instructions, please refer to our article or explore our Postman collection. Should you require further assistance, your Customer Success Manager or our support team at support@hellocustomer.com are readily available to help.